Building a RISC-V KVM (rvKVM) from Scratch - Part 1
Posted on Saturday, 18 March 2023 Suggest An EditTable of Contents

Introduction
Embarking on a journey to construct a RISC-V KVM (RVKVM) from the ground up, we find ourselves venturing into the captivating realms of computer science and RISC-V architecture. Our ultimate goal is to craft a KVM (Keyboard, Video, and Mouse) solution based on the VisionFive 2 development board. As we progress, we’ll chronicle our experiences and share the knowledge we acquire while delving into the intricacies of hardware and software.
Hardware Components
StarFive VisionFive 2 development board
A potent RISC-V based single-board computer, sporting the StarFive JH7110 RISC-V quad-core CPU, clocking in at 1.5 GHz with 2 MB of L2 cache and a monitor core. This versatile board brims with a plethora of peripherals and interfaces, making it ideal for AI and edge computing applications. It also features the IMG BXE-4-32 MC1 GPU with a frequency of up to 600 MHz, offering powerful video processing capabilities.
This hardware packs a punch in terms of memory as well, offering 2 GB, 4 GB, or 8 GB of LPDDR4 SDRAM, reaching speeds up to 2,800 Mbps. With its onboard TF card slot, the VisionFive 2 can even boot from the TF card.
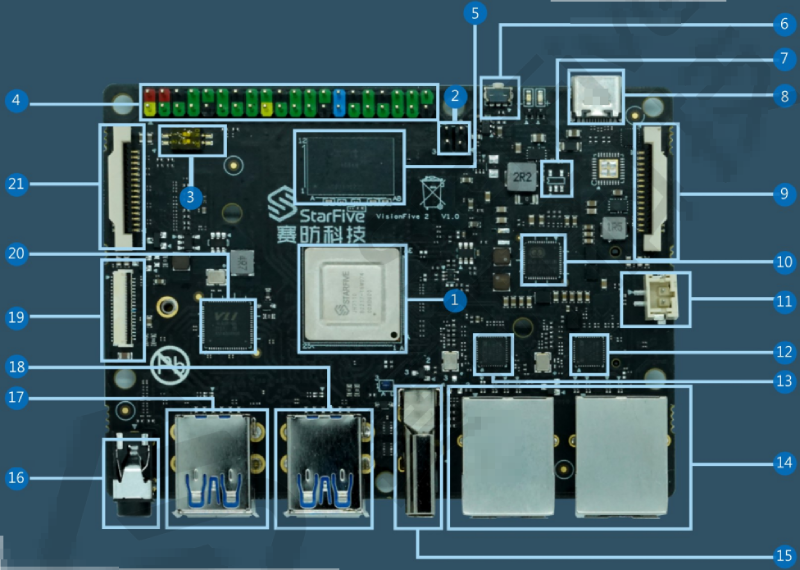
| Number | Object | Number | Object |
|---|---|---|---|
| 1 | StarFive JH7110 | 14 | 2 × Ethernet Ports (RJ45) |
| 2 | PoE Header | 15 | HDMI 2.0 Port |
| 3 | Boot Mode Pins | 16 | 3.5 mm Audio Jack |
| 4 | 40-Pin GPIO Header | 17 | 2 × USB 3.0 Port |
| 5 | LPDDR4 SDRAM | 18 | 2 × USB 3.0 Port |
| 6 | Reset Button | 19 | 4-Lane MIPI DSI |
| 7 | EEPROM | 20 | USB 3.0 Host Controller |
| 8 | USB-C Port | 21 | 2-Lane MIPI DSI |
| 9 | 2-Lane MIPI CSI | 22 | eMMC Socket |
| 10 | PMIC | 23 | TF Card Slot |
| 11 | 2-Pin Fan Header | 24 | QSPI Flash |
| 12 | GMAC0 PHY | 25 | M.2 M-Key |
| 13 | GMAC1 PHY |
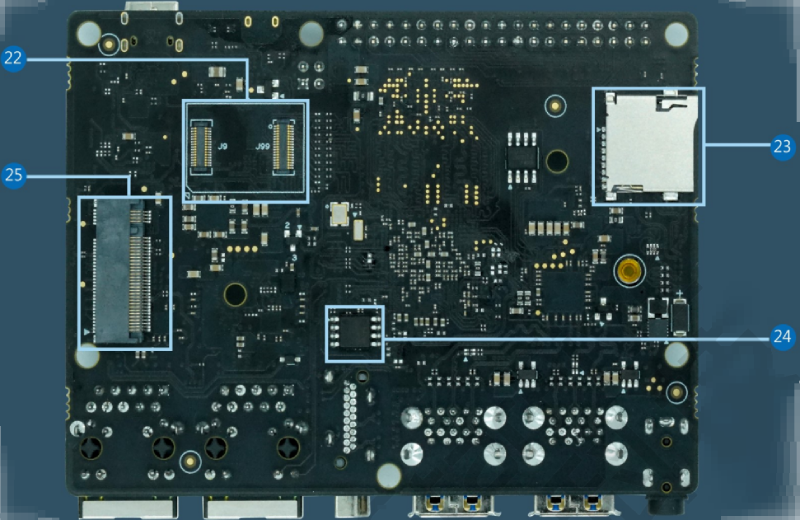 In terms of interfaces, the VisionFive 2 boasts a 2-lane MIPI DSI, 4-lane MIPI DSI, 2-lane MIPI CSI, 3.5 mm audio jack,
USB-C port for charging, USB device port, 4 USB 3.0 ports, HDMI 2.0, 2 RJ45 Ethernet ports, 4-pin PoE header, 2-pin fan header,
reset button, and a 40-pin GPIO header with various options such as 3.3 V, 5 V, Ground, GPIO, CAN bus, DMIC, I2C, I2S, PWM, SPI, UART, and more!
In terms of interfaces, the VisionFive 2 boasts a 2-lane MIPI DSI, 4-lane MIPI DSI, 2-lane MIPI CSI, 3.5 mm audio jack,
USB-C port for charging, USB device port, 4 USB 3.0 ports, HDMI 2.0, 2 RJ45 Ethernet ports, 4-pin PoE header, 2-pin fan header,
reset button, and a 40-pin GPIO header with various options such as 3.3 V, 5 V, Ground, GPIO, CAN bus, DMIC, I2C, I2S, PWM, SPI, UART, and more!
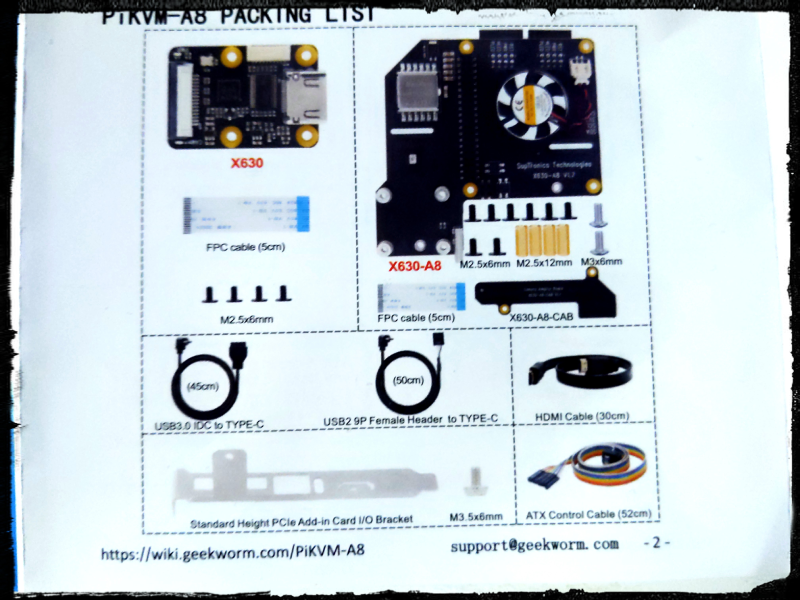
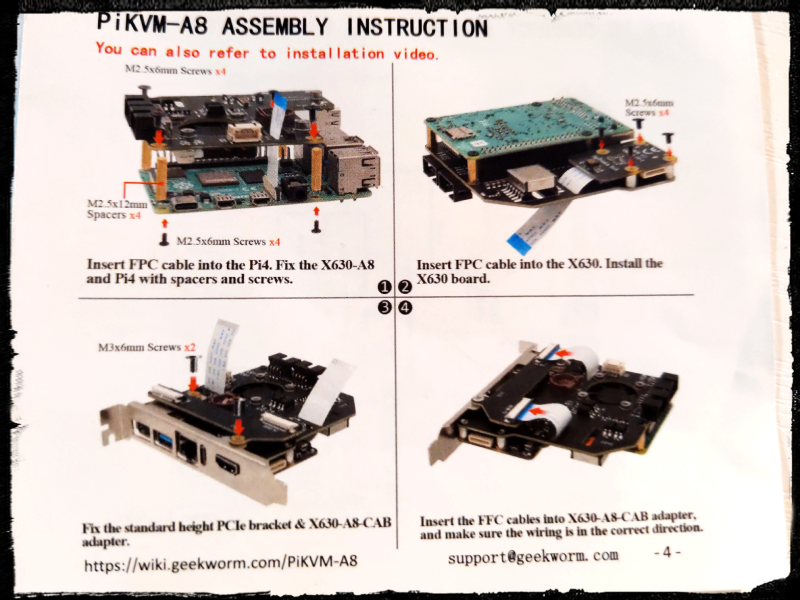
Geekworm Pikvm-A8:
A HAT (Hardware Attached on Top) fashioned for the Raspberry Pi, enabling the creation of a Pi-KVM system. Although primarily designed for Raspberry Pi, we’ve ascertained its physical compatibility with the VisionFive 2 development board. The HAT fits perfectly on the VisionFive 2 board, requiring only a longer FFC cable to establish a connection.
Initial Hardware Setup
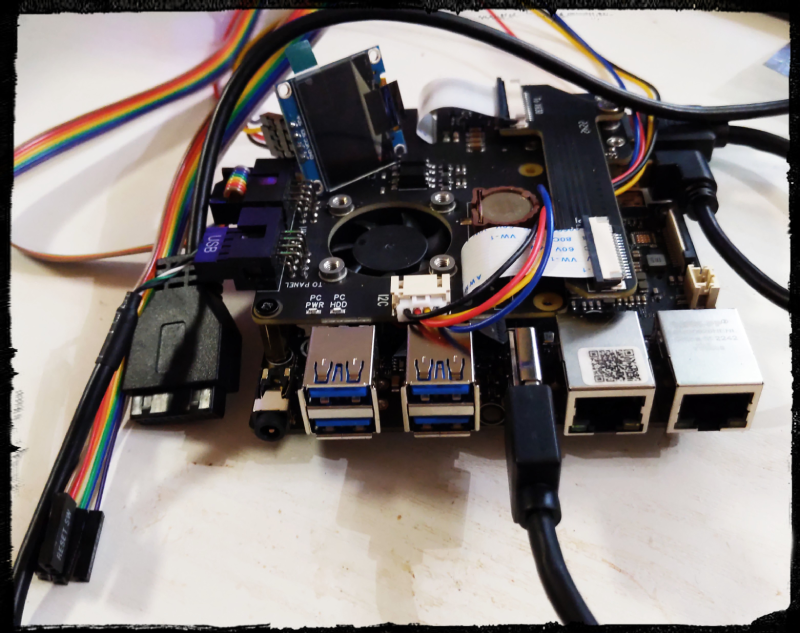
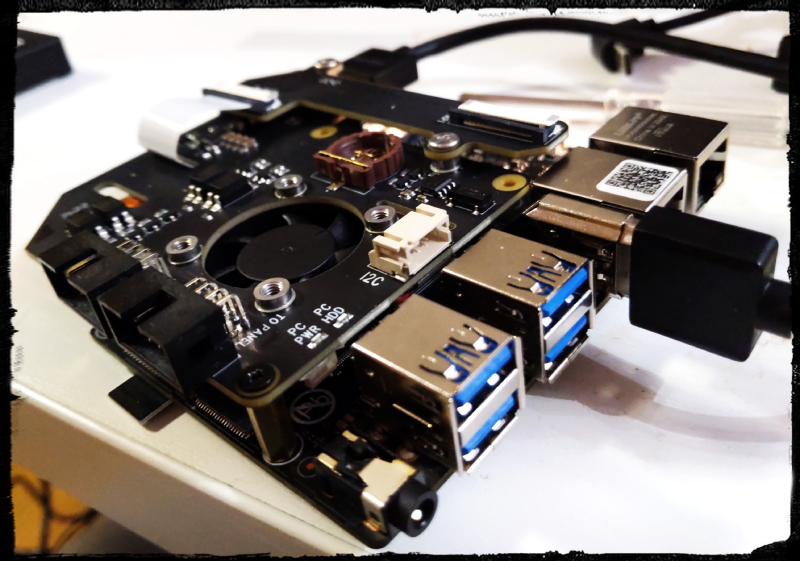
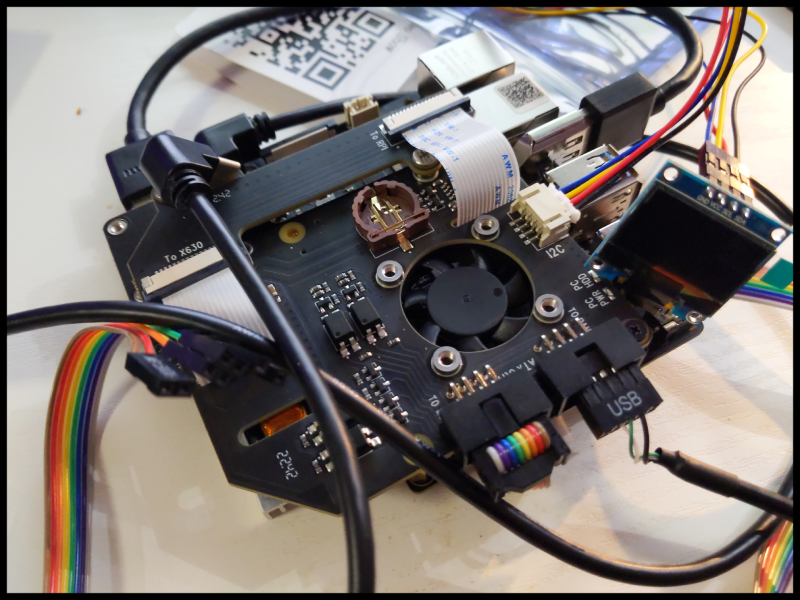
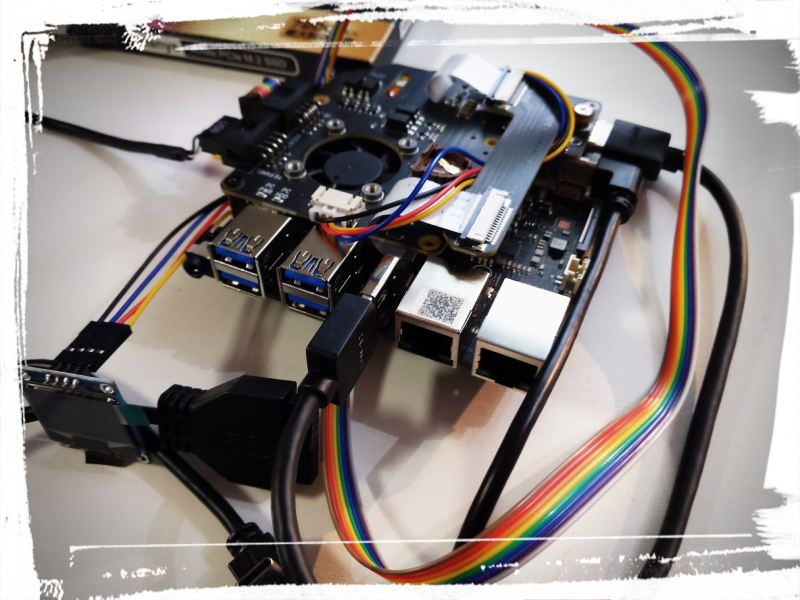
Armed with these components, we’ve married the Geekworm Pikvm-A8 HAT to the VisionFive 2 development board, laying the cornerstone for our RVKVM system. Our assembly consists of placing the HAT on top of the VisionFive 2 board, then positioning the x630 board on the HAT, on the same side as the RISC-V board. Next, we attach the x630-A8-CAB adapter on top and connect the extended FPC cable. This creates a solid hardware foundation to build our KVM solution.
KVM Functionality and Connections
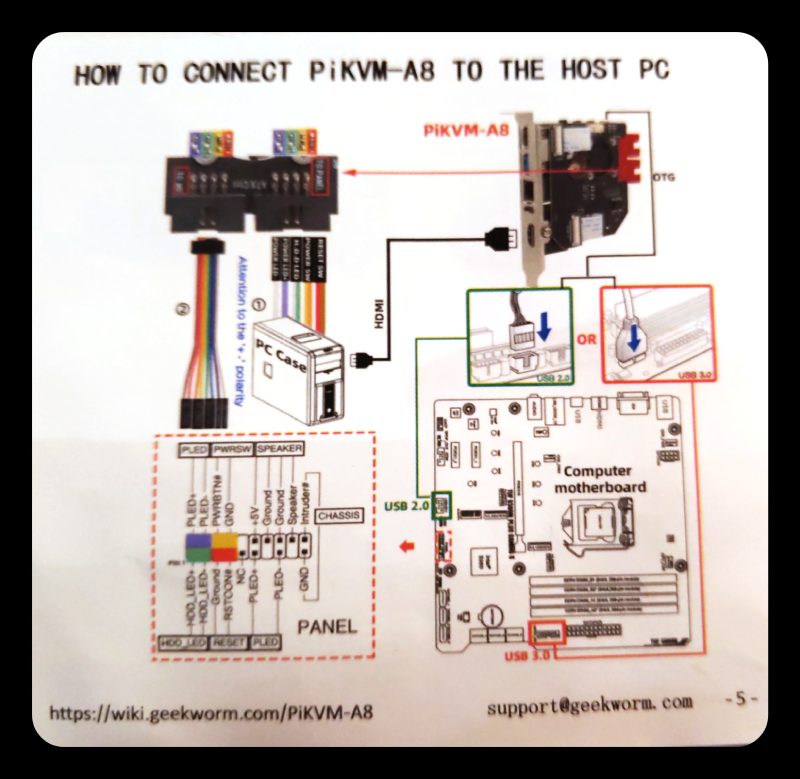
A KVM (Keyboard, Video, and Mouse) switch allows users to control multiple computers using a single set of input devices and display(s). In our case, the Geekworm Pikvm-A8 HAT serves as the KVM component that interfaces with the VisionFive 2 development board. The HAT facilitates the transmission of video signals, keyboard and mouse input, and virtual media over IP, enabling remote control of the connected systems.
 The ATX control cables are responsible for remotely managing the power state of the target computer,
allowing you to turn it on, off, or reset it as needed. These cables connect to the motherboard’s power
switch and reset headers.
The ATX control cables are responsible for remotely managing the power state of the target computer,
allowing you to turn it on, off, or reset it as needed. These cables connect to the motherboard’s power
switch and reset headers.
For video capture, the HDMI camera bridging mechanism captures the video output from the target computer and transmits it to the KVM server. This allows you to remotely view and interact with the target computer’s display, creating a seamless remote control experience.
Project Goals and Expectations
Our ambitious project revolves around these key objectives:
- Install a bootloader on the VisionFive 2 development board.
- Deploy Arch Linux on the board, laying a firm foundation for our KVM setup.
- Configure the board as a KVM server utilizing KVM and QEMU.
- Adapt and compile the Pi-KVM software for smooth operation on the RISC-V platform.
- Set up and calibrate the Geekworm Pikvm-A8 HAT for integration with the VisionFive 2 development board.
Conclusion
In this inaugural installment of our RVKVM project, we’ve presented the hardware components, initial setup, and objectives driving our enterprise. As we forge ahead, expect a wealth of insights and experiences as we wrestle with the software elements – from bootloader and OS installation to tailoring the Pi-KVM software for the RISC-V platform. Keep an eye out for updates chronicling our progress and revelations in this exhilarating learning odyssey!